How to Make a Origami Boomerang Airplane
I'm a published children's book author, magazine writer, and technology blogger. In my spare time, I like to sew.
There are several different paper airplane styles with boomerang action.
Prokidwriter
3 Ways to Make Boomerang Paper Airplanes
A boomerang paper airplane is a folded paper plane that flies back to you. Some designs fly in a vertical circle from low to high, and others fly in a more traditional horizontal pattern. All are loads of fun for kids to try, though there are some tricks to attaining success.
I tried three different paper airplane designs to see which design is the easiest to build and which gives the most consistent boomerang action.
- The first, a kid-friendly design, has only a few folds and relies upon tail-flap adjustments to get the plane to fly back to you.
- The second, an origami design, also has few folds, but flies back in a vertical loop instead of horizontally.
- The third, a more advanced plane folded by The Paper Airplane Guy, has numerous tricky folds, but results in a breathtakingly fun paper toy, even when the plane isn't folded perfectly.
My first plane, in fact, was quite the mess, but it performed well in spite of my questionable folding abilities.
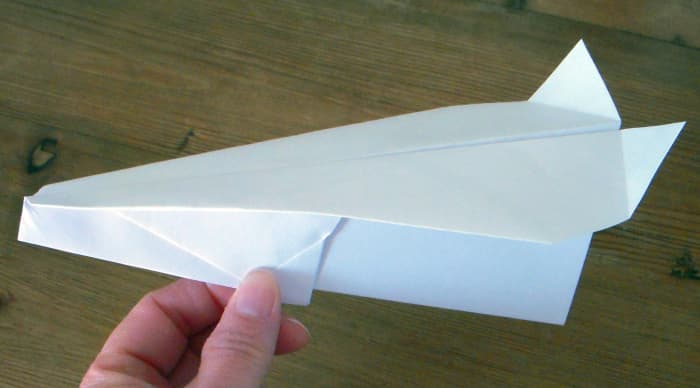
This simple boomerang paper airplane will fly back to you.
Prokidwriter
How to Make a Boomerang Paper Airplane
To make this kid-friendly boomerang paper airplane, you will need one sheet of 8.5"x11" paper. (Copy paper works well.) Then:
A. "Valley fold" the paper lengthwise in half, making a sharp crease and open the paper.
B. Fold two corners to the centerline, making a point on one long end of the paper.
C. Fold the point down width-wise, so that it looks like an "envelope flap."
D. Fold the top corners of the paper down so that they meet at the centerline, just above the point of the "envelope flap." This time, there will not be a point at the top of the paper. (See photo or video for example.)
E. Now fold the small point of the "envelope flap" up, creasing it so that it stays folded.
F. Fold the paper lengthwise in "mountain fold" direction.
G. Fold the wings so that the edge of the paper lines up with the centerline.
H. Fold the tail flaps up so that the crease lines up with the back edge of the plane.
To Fly
You're now ready to fly! Hold the airplane to the side and toss it away from you, at a slightly "banked" angle. The plane should fly in a horizontal circle back to you.
- Adjusting the tail flaps will help make the airplane boomerang back to you.
- Shape the wings to make them slightly curved to help make the airplane boomerang back.
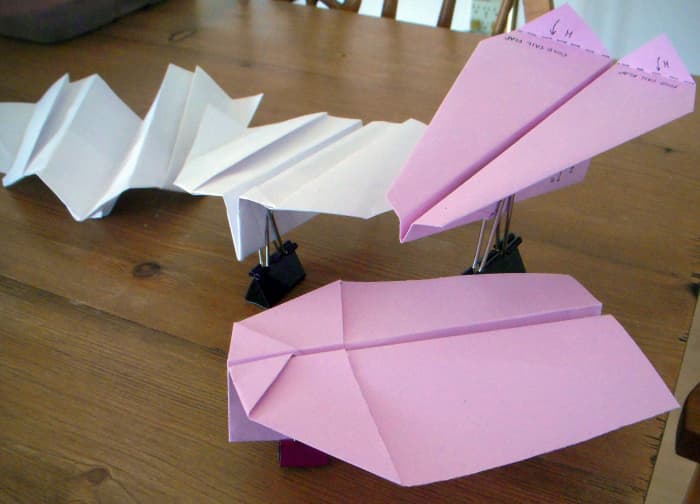
- See the table at the end of this article for my test results comparing this boomerang plane to other designs!
Boomerang Paper Airplane Instructions: Illustrations for Each Step
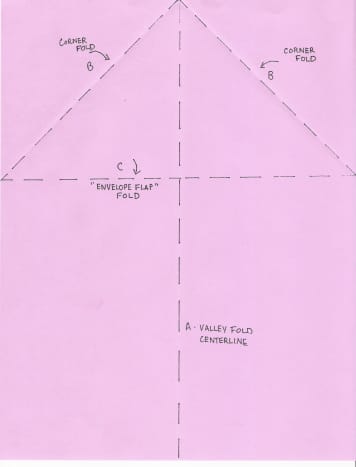
A. Valley fold centerline B. Fold corners to center line C. "Envelope flap" fold
Origami-style plane has few folds, dependable easy style.
Prokidwriter
Read More From Feltmagnet
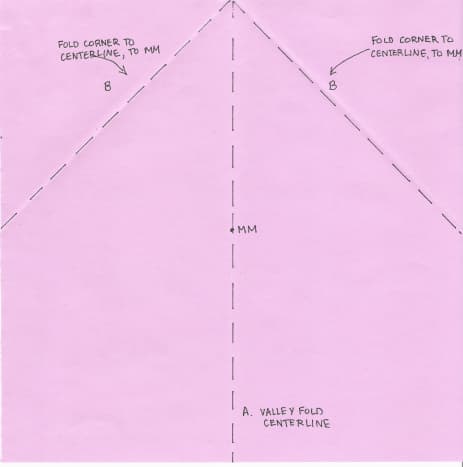
Instructions for Origami Boomerang Paper Airplane
This is a standard origami design that is very easy to fold. The boomerang action, though, is a bit different - the plane flies in a vertical loop from bottom to top, or "up and over" by some accounts. It is pretty consistent, however, and so it makes for a fun kid's boomerang paper plane.
To make this plane, you will need one square piece of origami paper. I used a piece of copy paper cut to 8.5" square.
A. "Valley-fold" paper in half and open.
B. Fold top corners down to centerline, coming together at mark "MM", and making a point at the top of the paper.
C. With point away from you, valley-fold point down so that it comes to mark "NN" which is about 3/4" below mark MM.
D. Valley-fold point up to mark "OO" about 3/4" above the horizontal top of the paper.
E. Valley-fold point down so that the tip is on the centerline, and in line with the top of the paper.
F. Refold the paper down the centerline.
G. Fold the wing down along the nose of the plane at an upward angle (see photo or video.) This creates the wings and the body of the plane. Do both wings. Open out the wings so that they are horizontal and flat.
To Fly
Point the nose of the plane slightly downward and toss. It should loop down and then up, right back to you. In my tests,(see table below,) this -plane was a very consistent performer, but if your results differ, try shaping the wings to improve boomerang action. See the table at the end of the article to see how this plane compares to the others!
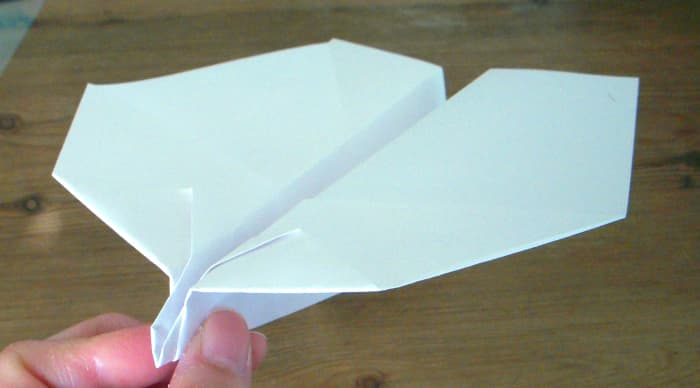
Origami Boomerang Paper Airplane Instructions: Illustrations for Each Step
A. Valley fold centerline B. Fold corners to mark MM
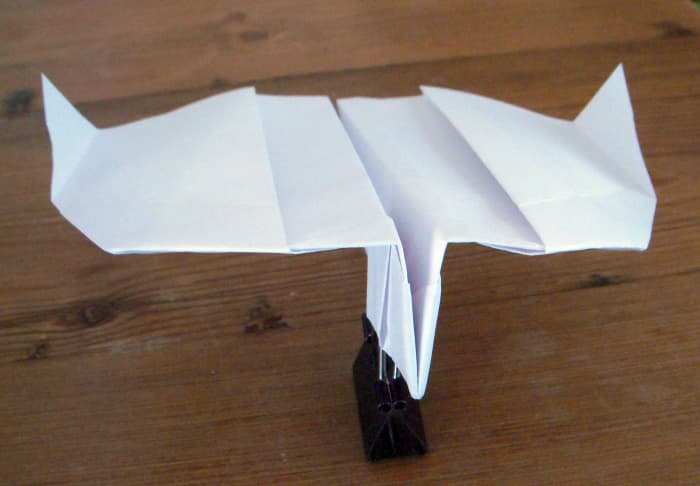
Wonderfully fun boomerang action paper airplane, folded using the Paper Airplane Guy's instructions.
Prokidwriter
How to Make Guy's Boomerang Paper Plane
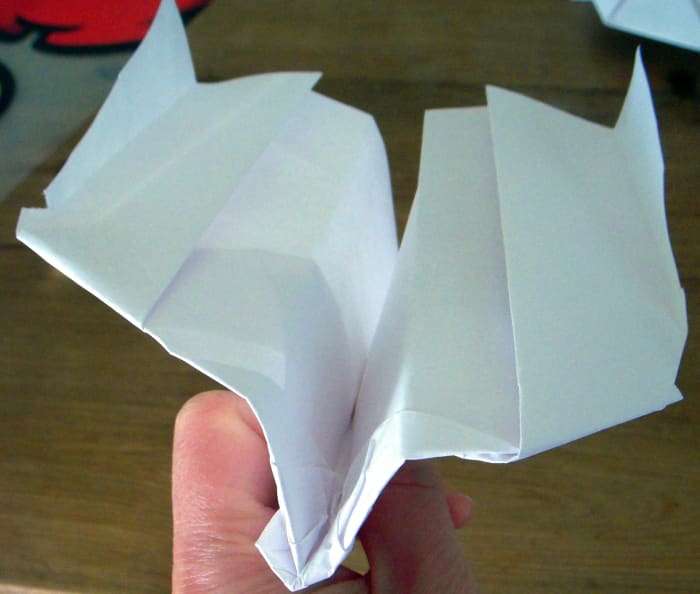
There are variations for this boomerang paper airplane, some more difficult to fold than others. The plane folded by The Paper Airplane Guy leans towards the difficult, but I found that even if you don't fold it perfectly, the resulting plane still has plenty of boomerang action, and is a hoot to play with. I've broken down how I folded my plane below, but follow the directions in The Paper Airplane Guy's YouTube video for best instructions.
To make this plane, you need one sheet of 8.5"x11" paper. I used copy paper.
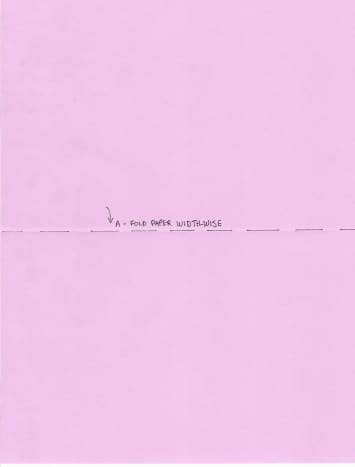
A. Fold paper in half width-wise. Orient centerfold towards you.
B. With paper still folded in half, fold the paper just enough to mark the center of the paper with a crease right on the centerfold line.
C. Then fold in one edge of the paper to that center mark just enough to make a crease at the 1/4 point on the centerline. (If you were to measure with a ruler, you'd make marks along the center fold at 2 1/8" and 4 1/4".)
D. Fold bottom left corner up to make a valley fold that runs from the top corner to the first crease mark at 2 1/8".
E. Lift the flap you just made and open the pocket to create "squash fold," lining up crease to edge.
F. Turn paper over and fold edge of "squash fold" to back. Turn paper to front with centerfold closest to you as before.
G. Fold down top corner close to tip of pocket, lining up left edges, making a valley fold that runs along top. Turn paper over and repeat, lining up edges before making the valley fold.
H. To fit the corner of the paper into the pocket, pinch corner in half, so that it fits into the pocket with open paper edges facing outward (as opposed to facing inward to the body of the plane.) Carefully wiggle the folded corner into the pocket until it is more or less even and edges are smooth.
I. If you've done the previous step correctly, you'll have a curved piece of paper that sticks out away from the plane. You want to flatten that curve by folding from the top outer edge of the pocket to the highest point of the pocket. Then finish by folding the top right corner down. (See photo and video.) Do H and I on the other side.
J. Now reorient the paper so that pockets are to your left and the centerfold of the paper is closest to you as before. Open up the wings by making a valley fold from the left most point to the top right fold. Turn the paper over and make the other wing.
K. Open the plane up so that the nose points towards you. Flatten the centerfold and squash fold the nose of the plane.
L. Turn the paper over and valley fold the nose to back.
M. Without turning the paper to front, Valley fold along the centerline.
N. Vally fold wing so that the body of the plane is about 1" wide. Repeat on the other side, matching up fold lines.
O. Create the wing flaps, making the folds so that they are slightly slanted upwards.
To Fly
Toss the plane away from you and watch as it glides in a perfect, beautiful circle right back to you!
The Paper Airplane Guy has a number of interesting and helpful tips for wing shaping to get better performance, but I found that even if folded imperfectly, the plane performs quite well. See the table below for performance data, and enjoy making and flying boomerang paper airplanes!
Guy's Paper Plane: Illustrations of Each Step
My first plane, following Airplane Guy's directions, was not perfect, but still resulted in a breathtakingly fun paper boomerang plane.
Prokidwriter
Which of These Planes Works Best?
| Plane Type | Number of Test Flights | Successful Flights | Notes | Benefit |
|---|---|---|---|---|
| Origami | 12 | 12 | Loops vertically, low to high | Dependable action, simple |
| Kid-Friendly | 12 | 3 | Need to Adjust tail flaps | Simple, standard paper size |
| The Paper Airplane Guy | 12 | 10 | Wide horizontal circle, fun | Fun, with a lesson too |
Questions & Answers
Question: Is a boomerang paper airplane hard to make?
Answer: Most of the planes are fairly easy to make. The Paper Airplane Guy's plane is the most challenging to fold, but not too difficult.
MakeShiftX on May 11, 2020:
niceeee
KA Hanna (author) from America's Finest City on January 21, 2019:
Trinity, Thanks for reading my hub. Your local library is a good resource for finding books on how to make paper airplanes.
Trinity on January 21, 2019:
How did you know about this
iugefriuahdglujgywrgfsjdfksbdfAKJSBFKLSDFKSNFJASJLDF on July 04, 2018:
great and nice teaching
vinay on January 24, 2016:
nice
Colin Garrow from Inverbervie, Scotland on June 09, 2015:
Your attention to detail is amazing – fantastic photos and easy to follow instructions. My son loves paper aeroplanes so he's going to love this! Great Hub. Voted up.
peachy from Home Sweet Home on November 28, 2014:
cool. your paper lane is different from mine,has bigger flaps and different designs
peachy from Home Sweet Home on September 10, 2014:
cool boomerang planes, i used to make origami planes
Mirmana from AMSTERDAM on August 06, 2014:
Ah, that feeling of nostalgia. I will save this hub for later. It's great that you included a step-by-step guide!
torrilynn on June 20, 2014:
this hub reminded me of when I was little and how I use to make origami all of the time in art class. my oh my how times have changed due to the improvement and advancement of technology. I thank you for this hub. voted up.
alexender on June 13, 2014:
mind blowing and step to step guide was amazing
Muebles de jardin from madrid on May 03, 2014:
Ohh, If i was able to find this good information when I was child...
Rebecca Mealey from Northeastern Georgia, USA on March 14, 2014:
Very cool!
floating mind from Chicago, Illinois on February 27, 2013:
I am really into planes and I currently am making my third paper plane. Good instructions and video examples. Nice hub. Now, if you will excuse me, I have to get back to flying my airplanes (paper that is). Thanks!
Sid Kemp from Boca Raton, Florida (near Miami and Palm Beach) on February 20, 2013:
Thanks! I haven't invented a new paper airplane design in over 40 years, but you've got me thinking! Voted up and interesting!
KA Hanna (author) from America's Finest City on February 19, 2013:
Thanks for commenting, glad you liked the hub!
prasetio30 from malang-indonesia on February 19, 2013:
Very informative hub and this hub deserve as the Hub of the Day. I am gonna show this to my students. I really enjoy the step by step instruction. Voted up!
Prasetio
KA Hanna (author) from America's Finest City on February 19, 2013:
Thanks jay, they are fun to make and have a good lesson to impart as well.
JITENDRA from INDIA on February 19, 2013:
Really these are very interesting .really encourgaing .......kids will deffinitely like these paper aeroplane
KA Hanna (author) from America's Finest City on February 18, 2013:
Thanks leahlefler!
Leah Lefler from Western New York on February 18, 2013:
These are so very cool! I have to try them with my two boys - they will LOVE them! I usually just fold my "standard" plane, which is not very exciting and often ends up nose-diving. These are very cool, and the instructions are extremely clear and easy to follow. Congrats on HOTD!
KA Hanna (author) from America's Finest City on February 18, 2013:
thanks dreamhowl!
Jessica Peri from United States on February 18, 2013:
Just wanted to say congrats on being hub of the day!
Priyanka Estambale from United States on February 18, 2013:
Made me remember some Childhood memories! Thanks for Sharing & Congrats!
KA Hanna (author) from America's Finest City on February 18, 2013:
Thanks nufoundglory, let me know your results!
KA Hanna (author) from America's Finest City on February 18, 2013:
Thanks for commenting!
KA Hanna (author) from America's Finest City on February 18, 2013:
Thanks for commenting twilanelson! Paper folding is a lot of fun.
KA Hanna (author) from America's Finest City on February 18, 2013:
Thanks for checking out my hub drgoshi!
KA Hanna (author) from America's Finest City on February 18, 2013:
Try adjusting the wings, curving them and such, to get different types of lift!
KA Hanna (author) from America's Finest City on February 18, 2013:
Thanks wayseeker! Appreciate that you checked out my hub!
KA Hanna (author) from America's Finest City on February 18, 2013:
Thanks for your comment John!
KA Hanna (author) from America's Finest City on February 18, 2013:
Thanks RTalloni!
KA Hanna (author) from America's Finest City on February 18, 2013:
Sky-attack sounds awesome fun!
KA Hanna (author) from America's Finest City on February 18, 2013:
Haha! Sounds like fun!
KA Hanna (author) from America's Finest City on February 18, 2013:
We did some fly-offs here, to see which planes flew best! With 3 granddaughters, you'll get in lots of test flights!
KA Hanna (author) from America's Finest City on February 18, 2013:
Making the planes brings back good memories!
KA Hanna (author) from America's Finest City on February 18, 2013:
Thanks ComfortB!
Comfort Babatola from Bonaire, GA, USA on February 18, 2013:
Nice step-by-step tutorial of how to make a boomerang paper airplane. This used to be a favorite pastime for those of us who grew up when there was no video game, computers, or cable networks.
It's good to see that it's still around. Congrats on the HOTD award!
Night Magic from Canada on February 18, 2013:
I haven't made a paper airplane since I was a kid. Thanks for the instructions. I'll have to try again.
CountryCityWoman from From New York City to North Carolina on February 18, 2013:
I love stuff like this. And when my 3 granddaughters come over I will be so prepared. I never would have thought of using those clips on the bottom to serve as a stand. This is big! Yay! And thanks a million!
Ann Pingrey-Korthas from Utah, United States on February 18, 2013:
I have three boys who are always asking for me to make paper airplanes for them. I can do this design you have shared! Thanks for the step by step instructions. My youngest will love the boomerang design!
Like coffeegginmyrice stated, my boys enjoy finding things to place in their airplanes and see how far the plane goes before dumping its cargo! AH! the joys of children!
Marites Mabugat-Simbajon from Toronto, Ontario on February 18, 2013:
I have enjoyed this paper airplane as well as the paper boat and paper kite in my childhood together with my brother. When we did a sky-attack, we just made lots of these paper airplanes and jets (larger with a longer pointy nose) with bits of torn-up pieces tucked inside, and released them. Lots of fun!
Sharing!
RTalloni on February 18, 2013:
Congrats on your Hub of the Day and thanks! I'm looking forward to making one of these for my little grandson and sending another for him to fold.
John MacNab from the banks of the St. Lawrence on February 18, 2013:
Perfect timing, prokidwriter. For weeks now, we've been trying to remember how to build paper aeroplanes for our granddaughters. Thank you. Voted up, useful, awesome and interesting. Now where is that paper?
wayseeker from Colorado on February 18, 2013:
Simply wonderful presentation of a very clever set of ideas. This will be a blessing to many families and kids (including my own). An honorably worthy HOTD hub you have here. Bravo!
Ruth R. Martin from Everywhere Online ~ Fingerlakes ~ Upstate New York on February 18, 2013:
We just made the kid friendly airplane, now we are gonna go fly it. The kids can't wait! Thanks for sharing!
nufoundglory from Asia on February 18, 2013:
Wow, amazing stuff. I'm going to go through this again and make the planes!
arslan.arsal10@googlemail.com on February 18, 2013:
wow its really good,i will definitely make it for my kids.thanks for your sharing.
Twila Nelson from Carmichael, California on February 18, 2013:
It is amazing how the most simple things we come across are so very interesting. Paper airplanes that perfectly fly, I love it. Thank you.
goshi from pakistan on February 18, 2013:
woww that's really nice
KA Hanna (author) from America's Finest City on February 11, 2013:
Thanks Dreamhowl!
Jessica Peri from United States on February 11, 2013:
It's great that you provided step-by-step pictures. These planes can be fun when you make them right; when I was younger my brothers and I used to see who could make the best ones. But I also don't think we used proper designs, hence the reason why they barely worked. Voted up and awesome.
How to Make a Origami Boomerang Airplane
Source: https://feltmagnet.com/crafts/How-to-Make-a-Boomerang-Paper-Airplane
0 Response to "How to Make a Origami Boomerang Airplane"
Post a Comment